Blog Post: Web Development
In this blog post, you’ll create a simple webapp using Flask and describe the how you did it. The skills you’ll need are:
- Flask fundamentals, including
render_template(), the basic anatomy of templates, and user interactions. - Database skills, including adding items to databases and displaying them.
- Basic CSS in order to add a bit of personal flare to your webapp.
You are not required to deploy your app to the internet, although you are certainly welcome to do so if you wish.
The app you’re going to build is a simple message bank. It should do two things:
- Allow the user to submit messages to the bank.
- Allow the user to view a sample of the messages currently stored in the bank.
Additionally, you should use CSS to make your app look attractive and interesting! I encourage you to get creative on this.
Your Blog Post should contain several screencaps from the functioning of your app, as well as a discussion of the Python methods you implemented to create your app.
You are free to (and indeed encouraged) to build on any of the example apps from class, as well as any other resources you are able to find.
The code for your app must be hosted in a GitHub repository. I suggest you begin by creating such a repository. Commit and push each time you successfully add a new piece of functionality or resolve a bug.
§1. Enable Submissions
First, create a submit template with three user interface elements:
- A text box for submitting a message.
- A text box for submitting the name of the user.
- A “submit” button.
Personally, I found it helpful to put navigation links (the top two links at the top of the screen) inside a template called base.html. I then had the submit.html template extend base.html. You can find an example of extending templates in the code from our lecture on interactions and machine learning.
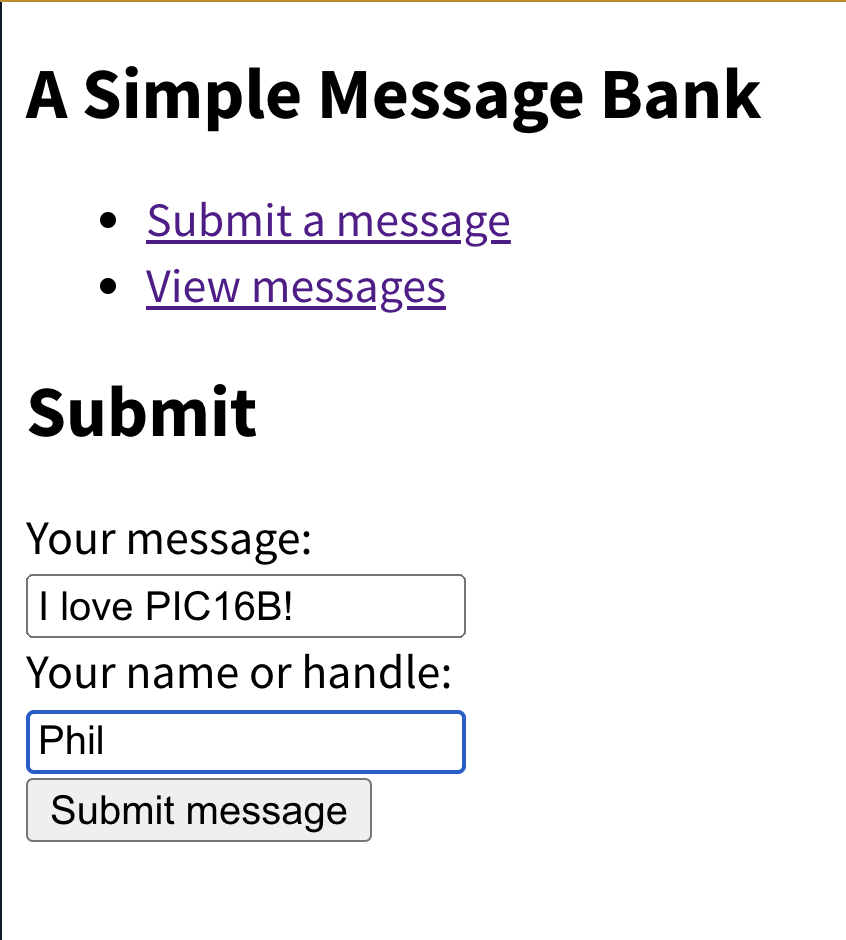
Here’s an example of my submission page:
Now, write two Python functions for database management in a new file app.py (you can also write them in a separate .py file and import them into app.py).
get_message_db()should handle creating the database of messages.- Check whether there is a database called
message_dbin thegattribute of the app. If not, then connect to that database, ensuring that the connection is an attribute ofg. To do this last step, write a line like dog.message_db = sqlite3.connect("messages_db.sqlite) - Check whether a table called
messagesexists inmessage_db, and create it if not. For this purpose, the SQL commandCREATE TABLE IF NOT EXISTSis helpful. Give the table anidcolumn (integer), ahandlecolumn (text), and amessagecolumn (text). - Return the connection
g.message_db.
- Check whether there is a database called
insert_message(request)should handle inserting a user message into the database of messages.- Extract the
messageand thehandlefromrequest. You’ll need to ensure that yoursubmit.htmltemplate creates these fields from user input by appropriately specifying thenameof the input elements. For example:<input type="text" name="message" id="message">is what I used in my template to ensure thatrequest.form["message"]contained the message input by the user. You should then return the message and the handle. - Using a cursor, insert the message into the
messagedatabase. Remember that you’ll need to provide an ID number, the handle, and the message itself. You’ll need to write a SQL command to perform the insertion.- Note: when working directly with SQL commands, it is necessary to run
db.commit()after inserting a row intodbin order to ensure that your row insertion has been saved. - You should ensure that the ID number of each message is unique. One way to do this is by setting the ID number of a message equal to one plus the current number of rows in
message_db. - Don’t forget to close the database connection within the function!
- Note: when working directly with SQL commands, it is necessary to run
- Extract the
Finally, write a function to render_template() the submit.html template. Since this page will both transmit and receive data, you should ensure that it supports both POST and GET methods, and give it appropriate behavior in each one. In the GET case, you can just render the submit.html template with no other parameters. In the POST case, you should call insert_message() (and then render the submit.html template). Maybe it would be nice to add a small note thanking the user for their submission?
§2. Viewing Random Submissions
Write a function called random_messages(n) which will return a collection of n random messages from the message_db, or fewer if necessary. This StackOverflow post might help. Don’t forget to close the database connection within the function!
Next, write a new template called view.html to display the messages extracted from random_messages(). Mine looked like this:
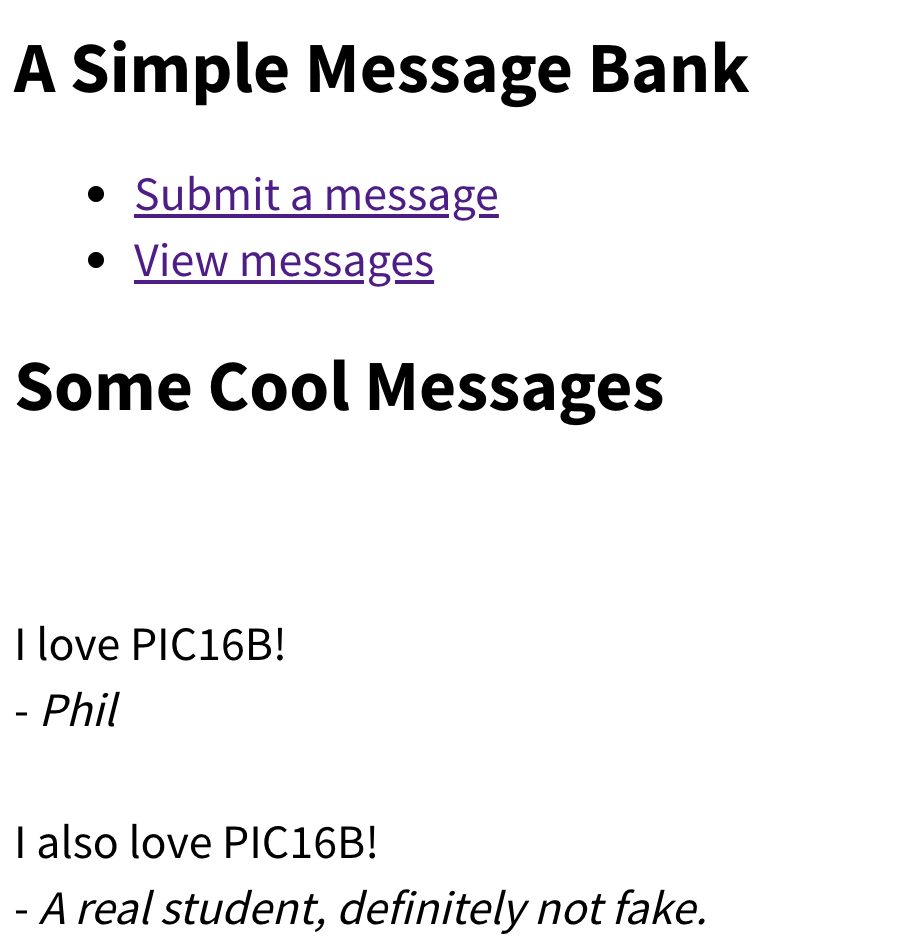
I took advantage of the fact that Jinja tags support looping (so I looped over the messages), and I also used the fact that Jinja tags support indexing of objects (so if m is a tuple of user handle and message m[0] contains the handle and m[1] contains the message).
Finally, write a function to render your view.html template. This function should first call random_messages() to grab some random messages (I chose a cap of 5), and then pass these messages as an argument to render_template().
§3. Customize Your App
Write some CSS to customize your app! At minimum, you should
- Incorporate a non-default font.
- Use color in some way.
Feel free to add additional CSS (and modify your templates if necessary) in order to give your app a personal feel.
My app in the screencaps above doesn’t include any color, because I wanted to focus on showing you the required functionality. Your app should be more colorful!!
§4. Blog Post
For your blog post, write a tutorial describing how you constructed your webpage. You should include:
- Separate code blocks and explanations for each of the Python functions you used to build your app (there should be at least 5).
- A discussion of at least one of the template files you used in your app. You can copy the source code of the template file into your markdown post.
- Your blog post must include two screencaps:
- In the first screencap, you should show an example of a user submitting a message. In the handle field, please use either your name or the nickname used on your PIC16B blog. I’ve demonstrated this in my screencap illustrating the submission interface in Section §1.
- In the second screencap, you should show an example of a user viewing submitted messages. Show at least two messages, one of which is the message you submitted in the previous screencap. This message should show your name or nickname. I’ve demonstrated this in my screencap illustrating the viewing interface in Section §2.
Additionally, please include in your blog post a link to the GitHub repository containing the code for your app.
Please remember that all specifications must be met in order for the blog post to earn credit.
Coding Problem
- Each of the required functions is implemented in a logical way.
- Each of the required functions appears to successfully achieve the required task.
- The functions that call
render_templatealso include the appropriate additional functions. For example, the function that renders theview.htmltemplate should also callrandom_messages(). - There is a
cssfile that changes the font and incorporates color in the interface in some way. These modifications must be visible in the supplied screencaps.
Style and Documentation
- Helpful comments are supplied throughout the code. Docstrings are not required in this blog post.
Writing
- The overall post is written in engaging and unambiguous English prose. There is written explanation throughout the post, such that a PIC16A student could learn to perform the demonstrated tasks by reading the post.
- Each block of code has a clearly-explained purpose.
- The post is organized into clearly delimited sections using markdown headers (#), making it easier for the reader to navigate.
- The post includes the two required screencaps demonstrating the submission and viewing pages of the app.
- The post includes a discussion of all Python functions used to create the app. This should include, at minimum,
get_message_db(),insert_message(),random_messages(), and the two functions used to render templates. - The post includes a discussion of at least one of the two templates.
- The blog post includes a link to the GitHub repository containing the code for the app.